
Welcome to another MEM article. Today I’m going to talk about an essential component of Microsoft Endpoint Manager where a lot of admins ignore or fail to configure. As your team grows or if you planning on outsourcing tasks to a different team of admins, a MSP perhaps, it is vital to configure correct RBAC (Role Based Access Control) within MEM. These roles are not covered by the Azure AD RBAC roles. The are the roles where you can block other admins from accessing. Worth noting that given the fact that the new features are coming in to MEM, you don’t need to provide keys to the kingdom to everyone. It’s the story of the Global Administrator all over again 😊
Why assigning Intune Administrator role to everyone is bad?
This is the administrator account which has all unrestricted access to MEM at the moment and this is an Azure AD Role. According to my experience, I have seen when the IT dept. gain the access to the portal, they make everyone an Intune Admin. This is not the correct way of doing so when you have few support levels. For example, the 1st level IT officer doesn’t need access to Wipe a device that’s enrolled to Intune or does not need access to BitLocker settings.
Let’s discuss about the Roles now.
Table of Content
- Endpoint Manager Just Enough Access Roles
- Built-in Roles
- Custom Role Creation
- Assign the role to admins
- Assign the Scope Tags to Endpoint Manager Objects
- Assign the Scope Tags to Endpoint Devices which are not in the Scope Groups
- The Result
- Final Words
Endpoint Manager Just Enough Access Roles
There are few built in roles where you can easily assign to the different support levels rather than giving them the Intune Admin role. Endpoint Manager roles are going in the path of Azure AD roles where it can provide Just Enough Access to admins.
Go to Endpoint Manager > Tenant administration > Roles
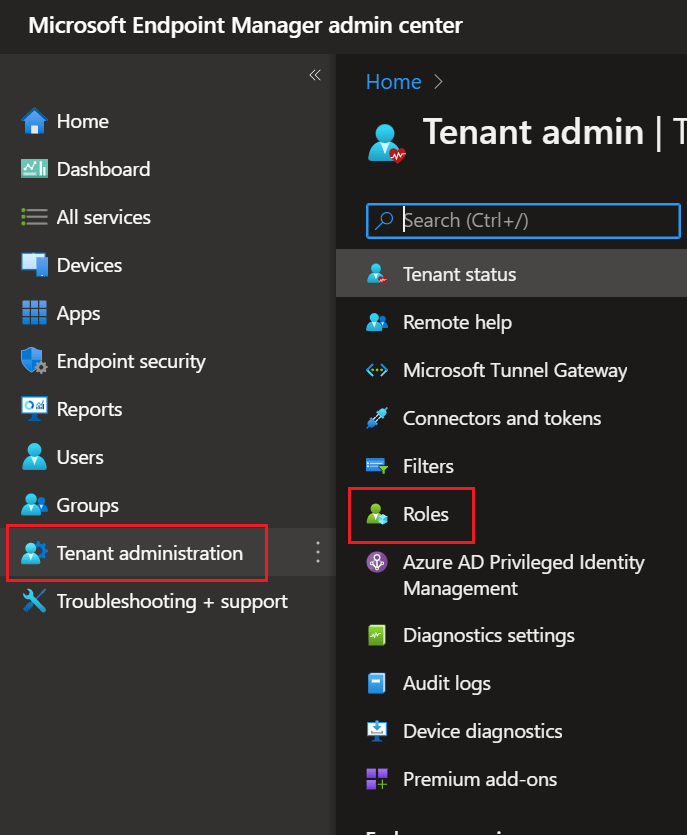
What can you see in Roles Blade which can be used for providing RBAC?
- Built-in Roles
- Create an Intune or Windows 365 role (W365 role option is in Preview)
- Scope Tags
Built-in Roles
| Role | Description |
| Application Manager | Application Managers manage mobile and managed applications, can read device information and can view device configuration profiles. |
| Endpoint Security Manager | Manages security and compliance features such as security baselines, device compliance, conditional access, and Microsoft Defender ATP. |
| Read Only Operator | Read Only Operators view user, device, enrollment, configuration and application information and cannot make changes to Intune. |
| School Administrator | School Administrators can manage apps and settings for their groups. They can take remote actions on devices, including remotely locking them, restarting them, and retiring them from management. |
| Policy and Profile manager | Policy and Profile Managers manage compliance policy, configuration profiles, Apple enrollment and corporate device identifiers. |
| Help Desk Operator | Help Desk Operators perform remote tasks on users and devices and can assign applications or policies to users or devices. |
| Intune Role Administrator | Intune Role Administrators manage custom Intune roles and add assignments for built-in Intune roles. It is the only Intune role that can assign permissions to Administrators. |
| Cloud PC Administrator | Cloud PC Administrator has read and write access to all Cloud PC features located within the Cloud PC blade. |
| Cloud PC Reader | Cloud PC Reader has read access to all Cloud PC features located within the Cloud PC blade. |
Out of the box the above are the roles where you can provide your admins with the necessary permissions they require to perform the day-to day admin tasks.
However if you need to create a customised role that has more or less options, you need to create a new role.
Custom Role Creation
There are two types of roles at the moment.
- Intune Roles
- Windows 365 Roles (Preview)
Custom roles just gives the opportunity to select every Endpoint Manager feature that’s available which is really good. Because of the sheer number of features it is best to take your time and create them and once create it’s just a matter of assigning them to the correct groups.
The permissions mainly contains Create/ Read/ Delete/ Update/ Assign etc. and every permission has a hover your mouse pop-up type explanation so the operation is easy to understand.
A teaser from the many permissions available in Intune Roles


Permissions available in Windows 365 roles
This is still in Preview and I believe more permissions will be available soon

Assign the role to admins
Alright, you selected the In-built role/s or create custom role/s. Now let’s see how to assign them
First off, lets understand the basics. Admin Groups, Scope Groups, Scope tags
Admin Groups
When you trying to assign a role to admins, the first you have to identify the group/s of admins who needs access to the role.
Pre-create your Azure AD Security groups and add the members to it

Let’s press Next and look at Scope Groups
Scope Groups
Scope Groups determines the accessibility of Users and Devices for the above mentioned groups. Ideally this sets a access boundary.
As an example you can create a user group that does not contain the company executives or their devices and assign the role to the 1st level admins so they won’t be able to access those user or device permissions.

Once done, move to Scope tags.
Scope Tags
Earlier we discussed the users and device scopes with Scope Groups. Scope Tags determines the Endpoint Manager objects the admins can access under the given role.
For the Devices it will do the same thing as Scope Groups if you add Devices to it.
Scope tags will further extends that ability on any device or object.
By default, all the Scope tags got the Default tag. Ideally this gives the controlled visibility over the Endpoint Manager objects.
Before applying Scope tags, we need to create them.
Endpoint Manager > Tenant administration > Roles > Scope (tags)

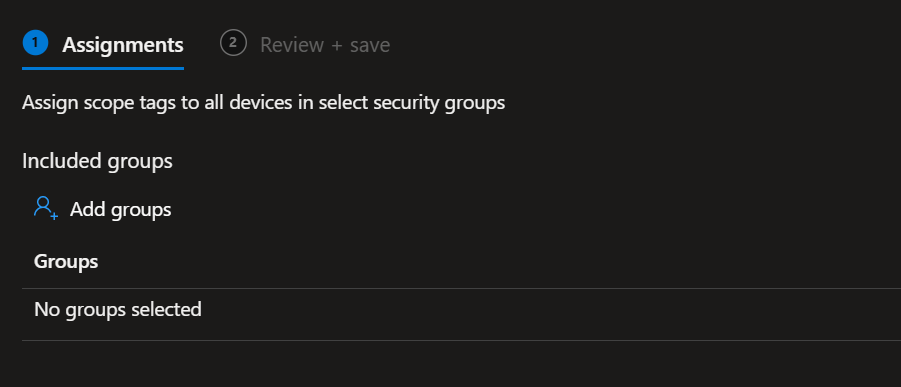
Create Tag > Provide Name and a Description and press Next

The nest part determines what device groups should tagged with this Scope Tag and they will be devices that will be available to the RBAC’d admin to access. Notice that I’m not selecting any groups at this stage. This means, none of the devices will be available for the RBAC’d admin.
Press Next and complete the Scope tag creation.
Now we have create the scope tag, lets assign it to the Role.
Go back to the role and assign the previously created Scope Tag

Once done, Press Create to finalise the role assignment.
Assign the Scope Tags to Endpoint Manager Objects
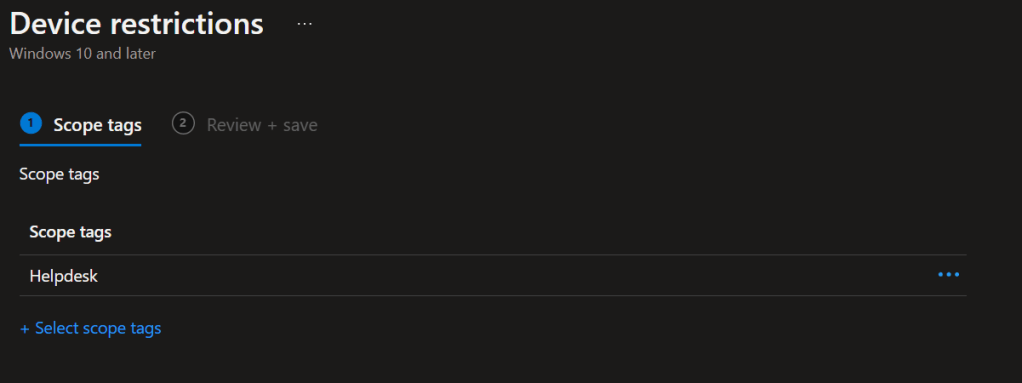
To any object your create (App. Policy, etc.) you can add the scope tags. so only those tagged objects will be visible when the RBAC’d admin logs in.
I have a config profile called Win10-DeviceConfig-Restrictions
You can add the scope tags when creating the objects (apps. policies) or edit the create object and go to the Scope section and add them.
Assign the Scope Tags to Endpoint Devices which are not in the Scope Groups
This will show how to add a tag to a Windows Device
Go to Endpoint Manager > Devices > Windows > Go to the device > Properties > go to the Scope tags section and click Open. By default the Default tag has been applied

Remove the Default tag and add the relevant tag and press Select and press Save

The Result
- RBAC’d admin can only see Endpoint Manager Permissions that they are assigned to – Admin Groups
- RBAC’d admin can only access the users and the devices in the Scope Groups – Scope Groups
- RBAC’d admin can see only the tagged Endpoint Manager Objects (per Object scope assignment) and devices – Scope tags assigned to objects
- RBAC’d admin can only see the tagged devices in their Endpoint Manager view (per Device scope assignment) – Scope tags assigned to devices
Final Words
By going through the RBAC settings and testing them for hours, what I noticed was it is 100% flexible on how you need to assign them and on what you need to assign them. Surely this is a time consuming task, but a much needed task and once you have the blueprints setup, it will be a smooth sail as far as the Endpoint Manager Role Based Access Controls are concerned.
Feature Image: Access Control Vectors by Vecteezy
Discover more from EMS Route
Subscribe to get the latest posts sent to your email.

3 thoughts on “How to Setup Endpoint Manager RBAC”