
Why automate such a workload?
Few reasons though
- Better Identity and access management
- Not having to update too many locations for these type of requests
Meet demands/ less stress on the frontline IT
This is the age of automation and everyone is in the automation bandwagon to automate the tech workloads in the cloud or on-premises.
If you have the right infrastructure, this can be easily achieved without going in to much trouble.
The automation magic happens when the user is created in the On premises AD with the specific attribute
Automation Process

- User will be auto added to the dynamic Azure AD group for Cloud licensing
- Licenses will be assigned to the user according to the Group Based Licensing setup
- User will be challenged for MFA with the Conditional Access policy
- User will get the Seamless SSO functionality after login to the domain joined computer
- Apps will be assigned for the user to use in the My Applications portal
- User will be getting access to the shares on the Azure Files
Prerequisites
- Hybrid Environment (Local AD — AAD Connect — Azure AD)
- Password Hash Synchronization activated in the AAD Connect tool
- Azure AD Premium 1 license per user or a an M365 license which have included the P1 option
- Appropriate licenses in the portal to assign the users
- An Azure subscription if you thinking of migrating the local file shares to Azure Files
The fun bit starts now
- Enable Seamless SSO
- Creating the AD User and setting the attribute/s
- Azure AD M365 Dynamic Group creation
- My Applications Portal with specific app access
- Group based licensing
- Azure AD Dynamic Security group and Conditional Access policy for MFA
- Setup Azure Files
Enable Seamless SSO
Open the Azure AD Sync Connect tool
Select Change User Sign-In option

Login from a Global Admin Account

Check “Enable Single Sign-on” option

Enter the credentials for the enterprise admin account for the domain
Click on Configure

Once the credentials were entered, press Next and press Configure

And done

Notice the highlighted computer in the Computers OU? That’s the object that is responsible of SSO for the domain joined computers

Its very important to perform a roll over the Kerberos decryption key periodically for security reasons.
Please check this article as it has the steps to preform this task
—Side note—
What is the difference between the single sign-on experience provided by Azure AD Join and Seamless SSO?
Azure AD Join provides SSO to users if their devices are registered with Azure AD. These devices don’t necessarily have to be domain-joined. SSO is provided using primary refresh tokens or PRTs, and not Kerberos. The user experience is most optimal on Windows 10 devices. SSO happens automatically on the Microsoft Edge browser. It also works on Chrome with the use of a browser extension.
You can use both Azure AD Join and Seamless SSO on your tenant. These two features are complementary. If both features are turned on, then SSO from Azure AD Join takes precedence over Seamless SSO.
One last thing to setup for Seamless SSO to work
Set the below GPOs by adding the following URLs to the Internet Zone settings URLs list so it will direct the user logon requests ‘seamlessly’ to Azure AD.
URL: https://autologon.microsoftazuread-sso.com
Policy 1:
User Configuration > Policy > Administrative Templates > Windows Components > Internet Explorer > Internet Control Panel > Security Page. Then select Site to Zone Assignment List
Value name: The Azure AD URL where the Kerberos tickets are forwarded
Value (Data): 1 indicates the Intranet zone.
https://autologon.microsoftazuread-sso.com
Value (Data): 1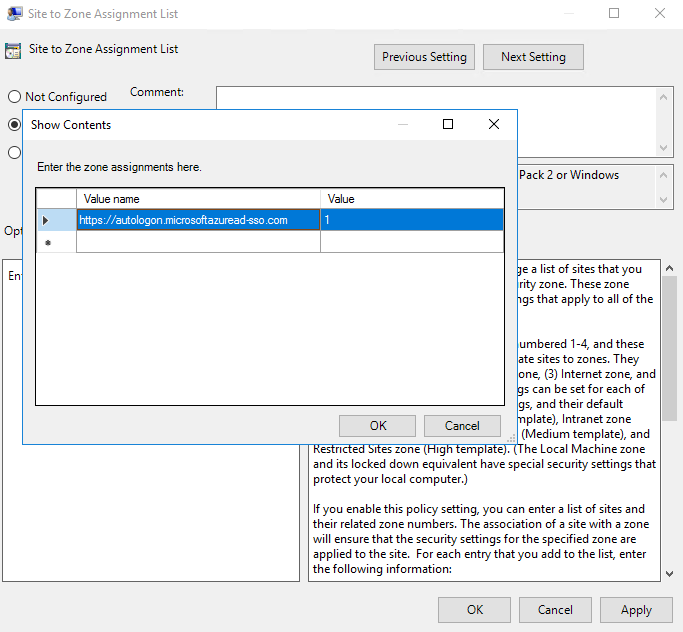
Policy 2:
User Configuration > Policy > Administrative Templates > Windows Components > Internet Explorer > Internet Control Panel > Security Page > Intranet Zone. Then select Enable updates to status bar via script.
Enable the policy setting, and then select OK.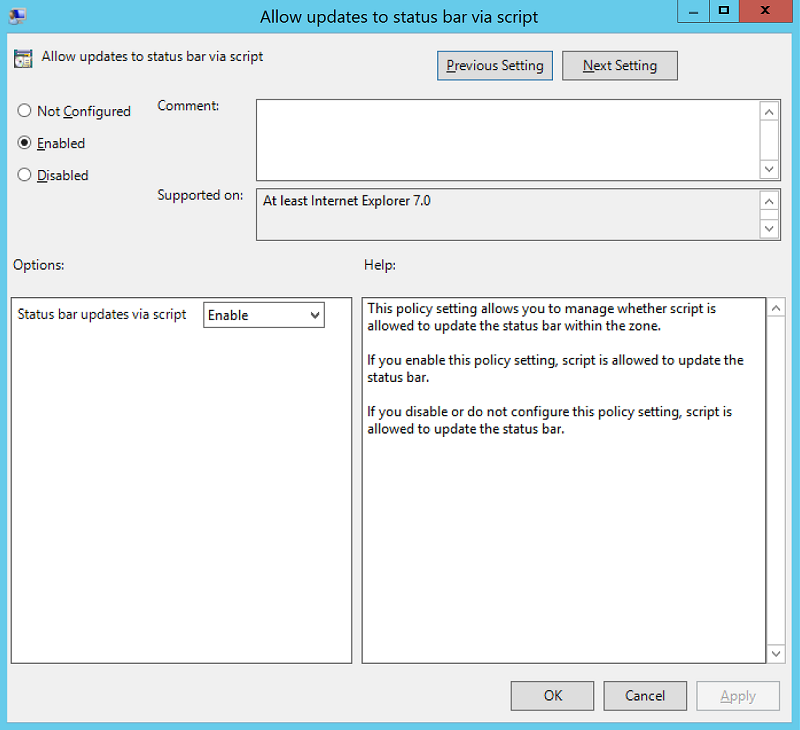
Notice the Azure AD portal
Navigate to Azure Active Directory > Azure AD Connect > USER SIGN-IN

Creating the AD User and setting the attribute/s
There are few ways to get around this. The easiest way is to go with the attributes that’s used everyday. Eg: Office, Department, Company and etc.
However, if you need to play with the Custom Attributes, there are 15 of them sitting in the attribute editor tab in the user’s local AD profile.
msDS-cloudExtensionAttribute1 to msDS-cloudExtensionAttribute15
They are not the same attributes set in the Dynamic Group rules, so there’s some additional work involves to sync the attributes to Azure AD.
In my example I have taken the msDS-cloudExtensionAttribute1 to be synced across to Azure AD
Eg- You can go with the Cost Center name/ number or any other string value. I’m using the tag finance-payroll or to make things easy fin-pr

Now lets sync that across. For this,
Open the Azure AD Connect tool –> Select customize synchronization options –> Select Directory extension attribute sync

Press Next on the screens that says “Azure AD Apps” and “Azure AD Attributes“
Select the Attributes and add them

Next on Ready to configure Configure and it will start synchronizing after
Azure AD Dynamic Group creation
Navigate to Azure Active Directory > Groups > New Group
Set the Group type as Security and Membership Type as “Dynamic User“

To add the query to add users dynamically,
Click on Add dynamic query
If you try to select the attribute from Property field now, the attribute we set from ad will not come up.
For this to be reflected, open a new tab and go to Azure AD portal again and navigate to Enterprise Applications
Search for the app Tenant Schema Extensions app
Configuration changes in Azure AD made by the wizard will be saved in this app. In our case, msDS-cloudExtensionAttribute1
Nothing much to do here, just grab the application ID for this app from the overview pane.


After grabbing the application ID, go back to the Dynamic Group creation tab and go to “Get custom extension properties”

Paste the App ID and hit “Refresh Properties“

The synced attribute will now start showing under the properties

Set your rule appropriately. Mine goes as below.

Once this is done, hit Save and Create so the Dynamic Group will be created with the query to go in.
My Applications Portal with specific app access
There can be requireminest for different Teams/ departments would get different apps. and if you have them registerd in Azure AD, it’s really easy to bundle them according to the groups and also they can open all the apps from one location. My apps portal
First, identify what apps your user groups need to access.
Go to Azure AD > Enterprise Applications > All Applications
Search for the App that needs to be assigned.
I’ve used the app Box as the example.
Under Users and Groups, I’ve added the Finance-Payroll group.
This will now start showing up in the My Applications Portal when a group member logs in
URL: https://myapplications.microsoft.com

Notice how Box will now appear when a group member logs in to the my applications portal

How Seamless SSO helps here?
User has already logged in to the domain joined computer and opening the my applications portal. The user just requires to type the username and when press Next, it will log the user in automatically and will be prompted for MFA challenge
If logging from a non domain joined computer, it will use the opportunistic feature of Seamless SSO and will prompt the user for the password followed by the MFA challenge.
MFA can make further limited to be prompted only when the computer/ device is not Azure AD Joined or Hybrid Azure AD joined as they are connected to the domain.
Group based licensing
You may have different licenisng requirements for different user groups depending in the department, user type, and the tasks they perform.
Eg – Frontline workforce doesnt need Office apps but may require web apps or Project managers may require MS Project app among the other apps,
or CXOs and management may require Azure AD P2 so IT can look for risky sign-ins and monimize trhe threats
Open dynamic group we created earlier and navigate to “Licenses” from the left-hand pane and select one or more licenses and it’s options that needs to be added for anyone who is a member of this group.

Next up, Azure AD Dynamic Security group and Conditional Access policy for MFA
Add the Finance-Payroll group for the selected users and groups option.
You can add more users and groups as you add more departments or teams or individual users

Selecting the all Cloud apps will require the user to enter all apps that are using Azure AD as the sign-in method in my opinion, this will make no room for error.

Enforcement to Grant Access with the MFA challenge
Set conditions to add all device types and exclude Hybrid Azure AD joined and Azure AD joined devices so MFA will only prompted when not in an office device. Further, try Geo blocking if required.

Lets, setup Azure Files
This can be an optional step, but if you already have Azure files setup (Kudos for you!) you can add the Dynamic group to the NTFS permissions for that Azure Files share.
Please refer this previous article for that – Azure Files
Automate further and Summary
You can further automate it to the SharePoint document library level so the these groups will get the necessary permissions automatically.
At the end of the day its the degree of how much you want to automate this process in order to save time and use the Modern Workplace methodologies. Once the background is set, it’s just a matter of creating the AD user with the specific attribute and rest will happen automatically.
Feature image : Mechanic Vectors by Vecteezy
Discover more from EMS Route
Subscribe to get the latest posts sent to your email.

Superb Article
LikeLiked by 2 people
Thanks Dinesh 👍🏽
LikeLiked by 1 person