
Windows Autopatch have come a long way to become the new normal of updating your Windows endpoints, M365 apps, device drivers and Edge browser with Intune whether the devices are physical (workstations/ laptops/ kiosks/ billboards) or virtual (AVD/ W365). Microsoft Learn documentation will have more detailed info into the services, but this is a short version and how you can quickly start working with Windows Autopatch. If you are new or want to get the best out of Windows Autopatch this guide is for you.
- What’s New in Autopatch?
- Prerequisites
- Conflicting Configs – When devices using a different method
- Creating Autopatch Groups
- Changing Values in Autopatch Settings
- Post-Device Registration Readiness Checks
- Excluding a Device
- Monitoring and Reporting
- Resolving Service Issues
- Messages and Service Health
- Useful Links
What’s New in Autopatch?
<<Check for any new feature updated in Autopatch Service>>
Prerequisites
- Device Join mode
Entra Joined or Entra Hybrid Joined
- Licenses
- Microsoft 365 Business Premium
- Windows 10/11 Education A3 or A5 (included in Microsoft 365 A3 or A5)
- Windows 10/11 Enterprise E3 or E5 (included in Microsoft 365 F3, E3, or E5)
- Windows 10/11 Enterprise E3 or E5 VDA
- Network Configuration
- RBAC
- Windows Autopatch Administrator
- Windows Autopatch Reader
- Intune custom role
- Device Groups
Have the Entra ID dynamic or assigned device groups ready. These groups can only be used in one Autopatch group setup.- Supports Entra groups synced from On-prem AD or ConfigMgr collections.
Conflicting Configs – When devices using a different method
- Active Directory Group Policy (GPO)
- Configuration Manager Device client settings
- Manual registry updates
- Local Group Policy settings applied during imaging (LGPO)
Registry keys inspected by Autopatch
HKLM:SOFTWARE\Policies\Microsoft\Windows\WindowsUpdate\DoNotConnectToWindowsUpdateInternetLocations Value=Any
HKLM:SOFTWARE\Policies\Microsoft\Windows\WindowsUpdate\DisableWindowsUpdateAccess Value=Any
HKLM:SOFTWARE\Policies\Microsoft\Windows\WindowsUpdate\AU\NoAutoUpdate Value=Any
Resolving conflicts: https://learn.microsoft.com/en-us/windows/deployment/windows-autopatch/references/windows-autopatch-conflicting-configurations#resolving-conflicts
Creating Autopatch Groups
To create the first Autopatch Group: Devices --> Windows Updates --> Create Autopatch group
To create more Autopatch groups, go to Tenant Administration --> Windows Autopatch --> Autopatch Groups
Maximum number of Autopatch groups: 300, Each group supports up to 15 deployment rings
An Autopatch group would contain,
- Deployment rings
- First, Last rings are pre-created.
- Create more rings depending on the requirement (eg: Department X_Ring)
- Deployment Ring Assignment
- Entra ID Groups – Can be dynamic or assigned
- Dynamic group distribution – Select the Entra ID groups that contains the devices (One or many) and select the percentage of the devices that will be distributed across the desired ring.
- New Entra ID device groups will be created automatically and will assign the devices to them according to the percentage provided.
- Test and Last rings need to have Assigned groups
- Update Types
- Quality updates
- Feature updates
- Driver updates
- Microsoft 365 apps updates
- Microsoft Edge updates
- Deployment Settings
- Feature Updates: Can be unselected if needed
- Driver updates: Select Auto or Manual approve
- Edge policies: Select Beta or Stable channel for each ring or use the same for all rings
- Release Schedule
- Select the Release Schedule Preset. Edit individual options if needed
- Shared device: Devices which are used by multiple users over a period of time.
- Information worker: Devices which are used by multiple users over a period of time.
- Kiosk and billboards: High uptime devices used to accomplish a specific task that hide notifications and reboot at a specific time.
- Reboot-sensitive devices: Devices whee it is critical that they aren’t interrupted in the middle of a task and only update at a scheduled time
- Select the Release Schedule Preset. Edit individual options if needed
From Microsoft:
In the Deployment rings page, select Add deployment ring to add the number of deployment rings to the Autopatch group. Autopatch assigns a default rollout schedule to ensure gradual deployment with deferral and deadline periods ranging from one to 20 days. When a new ring is added, its default deferral and deadline are spaced with existing rings to maintain deferral and deadline period compliance. Therefore, the deferral and deadline period of the new ring might be before or after the previous ring. Adding a new ring doesn’t modify the deferral or deadline of already existing rings. Autopatch doesn’t set deadlines on Sundays. The deadline is scheduled for the following Monday.
Changing Values in Autopatch Settings
While some values can be changed by navigating to different sections in Devices –> Windows Updates and others can be changed by navigating to the Autopatch group in Tenant Administration section.
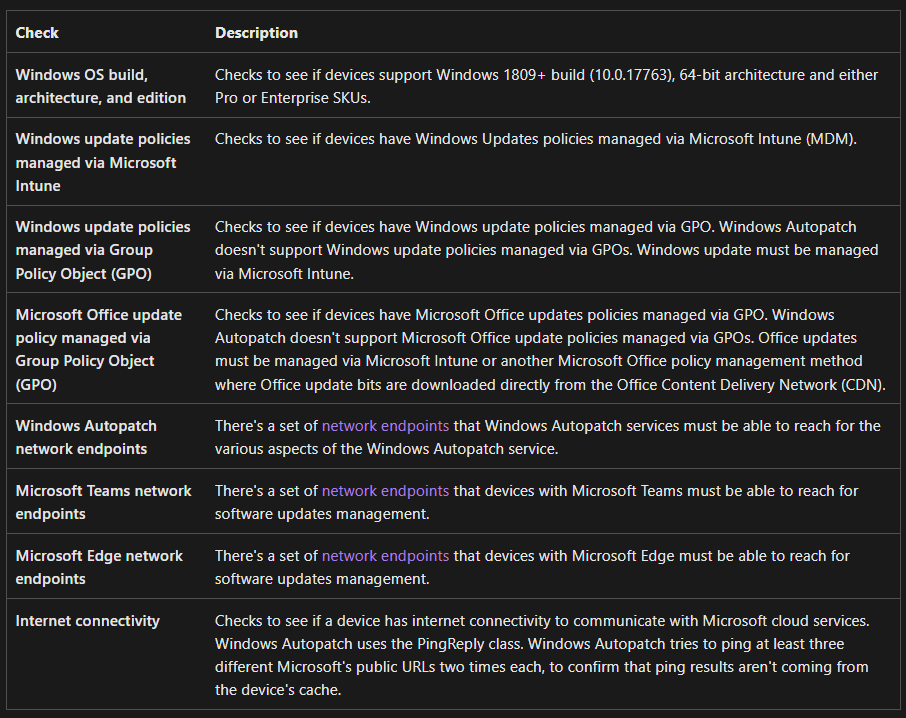
Post-Device Registration Readiness Checks
Windows Autopatch client agent will be installed after devices successfully registered with Windows Autopatch. This is responsible for performing the readiness checks and report the results back to the service.
Intune Admin Center --> Windows Autopatch --> Tenant management --> Actions
Checkpoints
Excluding a Device
Use Tenant Admin --> Windows Autopatch --> Devices, select device/s and Exclude
Removing the device from the Autopatch Registration Group or from any other group will not exclude the device from the service.
Monitoring and Reporting
Monitor
Devices --> Windows Autopatch --> Monitor
- Autopatch Groups Membership
- Deployment status per Windows update ring
- Feature update policies with alerts
- Expedited quality update policies with alerts
- Driver update policies with alerts
Reports
Reports --> Windows Autopatch
Resolving Service Issues
Tenant Admin --> Windows Autopatch --> Tenant Management
Critical actions to be checked and sorted ASAP. When a critical action is active, you might not be able to use Windows Autopatch features, and your tenant may be considered inactive by the service.
Action type: Maintain tenant access
Severity: Critical
Description: Required licenses expired. The licenses include:
- Microsoft Intune
- Microsoft Entra ID P1 or P2
- Microsoft 365 Business Premium
- Windows 10/11 Education A3 or higher
- Windows 10/11 Enterprise E3 or higher
- For more information about specific services plans, see Windows Autopatch Prerequisites
Once critical actions are resolved, it can take up to two hours for Windows Autopatch to return to an active state.
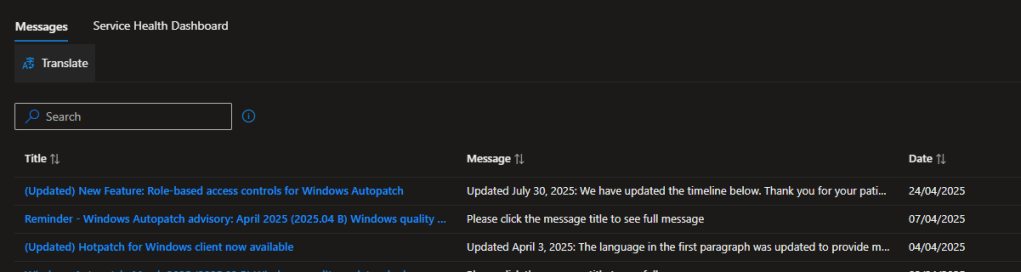
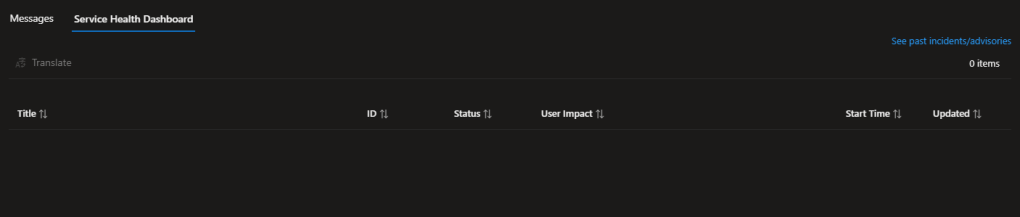
Messages and Service Health
Staying on top of the service is important when you are patching devices using Autopatch. This section will show you any updates from Microsoft related to the service and the overall health of Autopatch service.
Tenant Admin --> Windows Autopatch --> Messages
Useful Links
Support Requests: https://learn.microsoft.com/en-us/windows/deployment/windows-autopatch/manage/windows-autopatch-support-request
Autopatch on W365: https://learn.microsoft.com/en-us/windows/deployment/windows-autopatch/deploy/windows-autopatch-register-devices#windows-autopatch-on-windows-365-enterprise-workloads
Discover more from EMS Route
Subscribe to get the latest posts sent to your email.
